PVI Online course logo

Web Page Design Module 1: Creating Web Pages with HTML Tags


Anatomy of an HTML Tag
Tags have a very simple structure.  They begin with a < character and end with a > character.  For clarity purposes type your tags in lower case letters and enter each tag on a separate line.  Between the <> characters are the tag name and attributes.  Most attributes also require a value.  The general form of a tag is:   <tagname attirbute1= “value1” attribute2=”value2”>.    

Some tags come in pairs.  The first tag in the pair is called the opening tag.  The second tag in the pair is called the closing tag.  The general form of a closing tag is </tagname>.  The tags used to markup the text, “This is bold text” in bold would look like this:  <b>This is bold text. </b>.

Anatomy of an HTML File
You identify your text file as an HTML file by beginning your file with an opening <html> tag and ending your file with a closing </html> tag.  The file contains two different sections: a head section enclosed in an open <head> tag and a closing </head> tag; and a body section enclosed in an open <body> tag and a closing </body> tag. Every web page must include basic structure tags.  

Head Section
The <head> section is optional.  It lets you store information about the document itself.    
Information that is enclosed within the opening < head> tag and closing </ head> tag is not displayed on your web page. 

The first tag we usually enclosed with the head tags is a <title> tag.  The information that follows the <title> tag is displayed in the blue title bar.  Make sure you spell title correctly.  If you misspell title, nothing will be displayed on your webpage.   For example, this page has a title “Online PVI Web Page Design Module 1 Anatomy of Tags and HTML Files”.  So the basic structure tags to begin your HTML web page would be

<html>
<head>
<title> Online PVI Web Page Design Module 1 Anatomy of Tags and HTML Files</title>
</head>

Body Section
The <body> section starts a new section of our web page that will be displayed in the browser window. 

You can add as many blank lines as you want to make your HTML file easier to read.  To start a new paragraph use the <p> tag.  The browser will word-wrap all text correctly based on the width of the viewer’s screen size.  The <br> tag is used to force text to appear on a new line. 

There are many different types of tags that can be used to markup text in the body section.  The table below summarizes a few of the more useful tags. 

<i> </i>

Make the text italic.

<p></p>
<br></br>
<h1> </h1> 
<h2> </h2> 
<h3> </h3> 
<h4> </h4> 
<h5> </h5> 
<h6> </h6>

Start a new paragraph
Start a new line
Show different styles of "header" text, in descending order of importance (size). For example, the "HTML Made Really Easy" at the top of this page uses <h1>, and the "A Few More Useful Tags" just above uses <h2>.  The open heading tag also starts a new paragraph.

<hr>

Put a "horizontal rule" (line) in the page, like just above the title "A Few More Useful Tags", above.

<center> </center>

Centers text and images between the left and right margins.

Now it is your turn to try and compose your first html document
Create a sub-folder folder in your Web Page Design folder on your Google drive named HTML. Open Notepad and type in the following tags.  If you need assistance completing this exercise preview the Screen Captured Video. You can also find a link to this video on your Student Resources page.

<html>
<head>
<title> My First Webpage</title>
</head>
<body>
<center>
<h1>All About Me</h1>
<h2>Your Name</h2>
</center>
<hr>
</body>
</html>

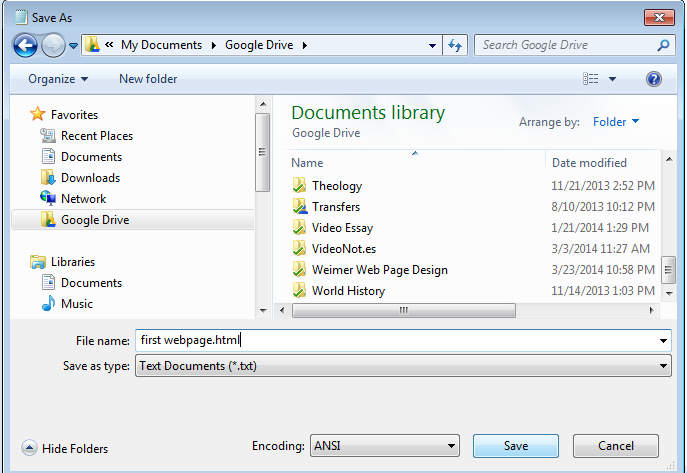
Saving a Notepad file as an HTML File
Before you can view your Notepad file as an HTML file you have to save it with the .html extension. Save the Notepad file you just created in your HTML file folder as an html file by including the .html extension in the file name. In this case the name of your file is first webpage.html. If you save it with the default .txt extension it won’t be displayed by a browser. 

Saving an html file

Now close your Notepad file, navigate to your HTML file folder on your Google Drive. Select first webpage to preview what your file will look like in a web browser.
first webpage html file

Your file it should look like this. If it doesn't return to your Notepad file and make the necessary corrections.

first webpage displayed in a browser

If you need assistance completing this exercise preview the Screen Captured Video. You can also find a link to this video on your Student Resources page. Send your mentor an emai with the Subject Line "Request for Help" if you need help finding the errors. If you do not need assistance, proceed with the next page Numbered and Bulleted Lists.

Back to Module 1 What is HTML Next Module 1 Numbered and Bulleted Lists